More work has been done on the house! First I finished the stone work on the other side of the house, apart from the section bellow the stairs which needed to be completely remodeled.


More work has been done on the house! First I finished the stone work on the other side of the house, apart from the section bellow the stairs which needed to be completely remodeled.
I finally found some time to continue work on my Townhouse. I did some stonework and added wooden beams to the walls. I also added two windows. When deciding were to put windows and other openings I always take in consideration both the esthetics and the gameplay.
I really like how this project is developing.


 I also started to work on a big Cavalry unit based on the 90s OOP Black Knights miniatures. The unit will compose of 24-27 knights and will represent Mortreich's Black Knights. I started by doing the skeletal steeds for the first rank.

Back to my Altburg Townhouse project! I decided to completely change the design of the original Merchant House model. I have lowered the floor so that the interior is a bit higher and can fit the minis more easily. I also replaced original wood planks with flagstone. I removed the front wall and extended the whole floor for about 2cm, again to have more space inside. The original doors were fixed, so I decided to replace them with the hinged version. Now the doors are fully functional. I removed all the textures and details in interior as well as on the exterior because I plan to completely redesign them.


The part that I was most excited about doing is the puke running down his belly. For this I used Woodland Scenics Fine Turf mixed with water and PVA glue to give it some texture. I think it turned out pretty well (disgusting) :D. Also I wanted his clothes and feet to be very dirty and his skin full of scabs and lesions from falling down and lack of hygiene. Scenery is from Tabletop World.
This mighty legion of skeletal warriors clad in dark, full plate armor represents the personal guard of Mortreich von Todtstein. His warrior legion also known as the “Black Host” or "Der Nachtguard" consist of the elite fighters gathered through many centuries, from all around the old world. Some of them where enrolled by being killed and resurrected afterwards, others dug out from their tombs and summoned along the way, and some joined Mortreich by their own free will, while they still lived, granting them upon their deaths the ultimate gift from their supreme commander, that of the un-death and service under his banner for all eternity! Highly efficient, remorseless, cruel as grave and bound to the mighty “Nightfang”, they obey every single word and command from their master.

Der Nachtguard is here to destroy the world of the living, and the only thing that is faster than the speed of light is the silence of the cursed night by which they travel! The Night and its creatures are one, and eventually they will absorb everything! Fear them, the Black Host has been unleashed!


I have finally finished this massive unit of 50 Armored Skeletons! I've been in the hobby for more then 20 years and this is the largest unit I have put together so far. It was starting to be a bit exhausting by the end but totally worth the effort. I really think they are a sight to behold. :) Also, it was quite expensive collecting these 90's OOP miniatures from different sellers on eBay. In my opinion, the 90's are golden years when it comes to Games Workshop miniatures. Since there are originally only five different skeletons I decided to convert a fair amount of them in order to make the unit look more varied. By simply swapping heads with those from the old plastic skeletons kit, adding horns and other decorations to their helmets, or even using Bretonnian and Empire helmets, I made the unit much more interesting. Originally I used Bretonian flag for the banner but later replaced it with one from the Grave Guard sprue because I wasn't quite happy with it. I wanted to make my banner resemble to those old school banners that where photocopied from the book and then cut out and painted. :) All in all, I'm very pleased with this unit and looking forward to moving on with my legions.
If you are interested in how I made the unique shields for the Black Guard check out this tutorial.


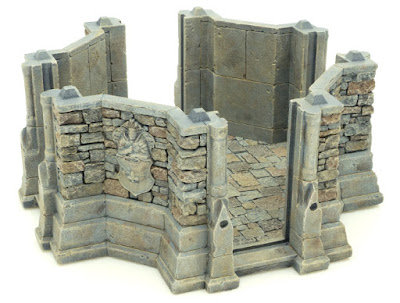
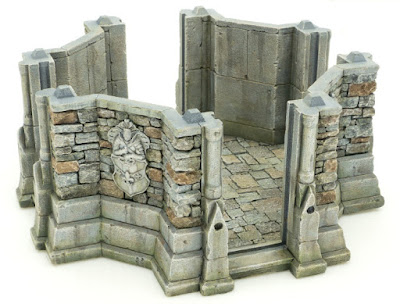
In this tutorial I will give you my recipe for painting stone. I will cover all the steps that I use to achieve the natural look of a stone wall. I will be doing an example of a wall with pronounced color differences between separate stones to make it more visible what I am doing in each step. The result will be a wall like this:


Basecoat the model in dark grey color. I am using Vallejo Game Air – Blue Grey. Then Highlight the model with a light grey color. I am using Vallejo Game Air - Cold Grey. The easiest way to do this is by using an airbrush or spray cans. However you can use a regular brush as well. In that case use drybrush technique to apply lighter grey over the dark grey.

To get some variety in stone tones and make it look more realistic, you will be adding different brown colors to individual stones. Pick some of the stones with watered down Citadel – Mournfang Brown. Dilute the paint significantly, you want a watercolor consistency. You can also vary in intensity of the color on different stones. More variety - the better. On the large flat surfaces make random splotches with the same color.

Repeat the process from step 2 but using Citadel – XV-88. This time pick different stones.

Repeat the process from two previous steps, this time using Citadel - Agrax Eartshade. Also, leave some of the stones grey, don’t paint them all in brown colors.

Drybrush the whole model with Citadel – Karak Stone.

Drybrush the model with Citadel - Pallid Wych Flesh. Don't overdo it.

Wash the whole model with watered down sand color. I am using Vallejo Game Air – Sand. Dilute your paint significantly. After applying the wash make sure to collect the excess paint from the recesses using a dry brush, you don't want the bright color to accumulate in the recesses. This wash is serving as a filter necessary for further steps.

Repeat the same process as in step 7 but this time using Vallejo Game Air - Earth color and apply it sporadically, not over the whole model.
Again drybrush the model lightly with Citadel - Pallid Wych Flesh. Concentrate on the edges. It is a good idea to apply more of this color on the coat of arms relief to make it stand out more.

Now it’s time to add some contrast between different sections of the building and make it more visually appealing. Use Citadel – Nuln Oil and apply it along the edges where different planes of the building meet. Also, use the black wash to emphasize the parts you want, like the coat of arms relief for instance. Black wash was added all around the relief to make it really pop. On the flat areas, do some streaking effects to break monotony. Use a detailed brush to create some streaking effects on the relief. Whenever you apply the wash, blend it with stone using water. Also, a good general rule is to add more of the dark wash to the lower parts of the structure, where damp is more likely to collect.

Add some green tint to different areas of the model. Citadel – Athonian Camoshade is perfect for this. Concentrate most on the parts where you already applied the black wash. This will give it a nice mossy effect and make your walls look as though they ‘we been affected by moisture.

To add some richness to the green tones drybrush very lightly some of the areas (where you applied green wash) with Citadel - Deathworld Forest or any other green you like. Make it really subtle.

To reintroduce the contrast between some of the stones you will again pick individual stones with watered down Citadel – Mournfang Brown. Note that it is best to pick those stones that you already painted in this color in step 2. Pick only some of them, don’t overdo it.
Finally to make your walls really crisp, you will highlight some of the edges. Using detail brush run along the edges of some of the stones with Citadel – Pallid Wych Flesh. Do this on all of the stones you have painted in Mournfang Brown in the previous step and then some of the other stones.
