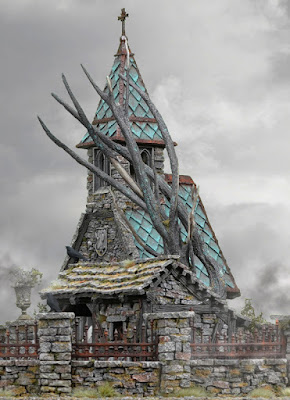
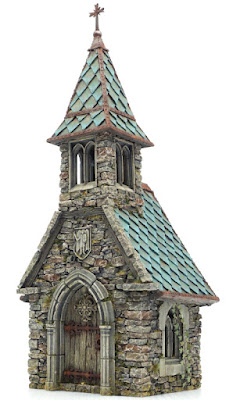
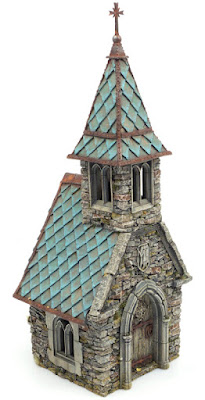
I had to put my Vampire Counts on a side for a while and paint this awesome Chapel from Tabletop World. It will be a part of the upcoming Graveyard kit. Kickstarter campaign for this project will launch in October 2020 and I have to paint all the elements (tombstones, mausoleums, dead trees, crows, coffins...) together with a display base for showcasing it, as soon as possible.
I will be posting more updates on this project but for now, here is the finished Chapel. I'm quite pleased how it turned out.
Monday, August 31, 2020
Tabletop World Chapel
Saturday, August 22, 2020
My Recipe For Painting Tree Trunks
STEP 1
First tings first. We need to prepare the model for painting. Tabletop World models come precleaned and are ready to paint out of the box. However, these Dead Trees come in several pieces and need to be assembled. Once you assemble your tree, use modelling putty to fill the gaps at the joints.
STEP 2
Basecoat the model and make a zenithal highlight. You can apply zenithal highlights with an airbrush or spray cans. The idea is to spray the brighter colors directly from above a dark painted model. This way yo will add contrast to a model and reveal details fast and easy.
- First, basecoat the model in black color. I like to use Vallejo Nato Black.
- Next, I use 50/50 mix of Vallejo Nato Black and Cold Grey and spray it downwards in a wider angle.
- Finally I like to use pure Vallejo Cold Grey and spray it directly from the top in about 45% degree angle.
STEP 4
To emphasize the bark texture even more I do a light drybrush technique with Citadel Karak Stone color. After this, I like to randomly apply watered down Citadel Agrax Earthshade to give some richness and variety to the colors, especially to the parts where I feel I overdid the drybrush technique, to tone it down.
STEP 5
To paint the exposed sapwood where the bark fell off I paint the areas in Citadel Karak Stone. Using the drybrush technique I highlight these areas in the middle with Citadel Ushabti Bone color. Finally I apply Agrax Earthshade to the edges, where sapwood and bark meet. Using a clean, wet brush I make a transition towards the middle over the colors underneath.
STEP 6
Time to add some lichen. In this step I use five colors. You can get away with using less, but to achieve really nice realistic effect and variety in colors, I advise you to use at least three. The colors of lichen my vary from green, blue and grey to yellow and brown. Also, lichens grow in a wide range of shapes and forms. Some are growing like tufts, some are two-dimensional leaf-like lobes, some are crust-like, some powdery etc. To represent different forms of lichen I will be using both paint (two-dimensional lichen) and different types of fine turf (three-dimensional lichen).
In this step I will be doing two-dimensional lichen. I start off by applying Citadel Waaagh Flesh with stippling technique. It is important that you use an old and distressed brush in this process. I dab off most of the paint on the paper towel and start applying the paint with dabbing motion. I repeated this process with the rest of my colors going from darker to lighter (Vallejo Foul Green, Citadel Nurgling Green, Citadel Nihilakh Oxide and Citadel Ceramite White). I tend to stipple these colors in condensed areas, next to each other to achieve variety in tones. Also, I do more lichen at the bottom of the tree and less going upwards.
STEP 7
For more three-dimensional lichen and moss I use two types of fine turf from Woodland Scenics: Green Grass and Burnt Grass. I use predominantly Burnt Grass, which is more yellowish, for lichen, and Green Grass for moss. However, I do like to combine the two in some areas. For lichen, I dab watered down PVA glue in small areas, preferably next to the already painted lichen, and than simply sprinkle the Burnt Grass over it. For moss I apply PVA glue in larger areas and proceed with the same process using Green Grass. I tend to do more moss towards the ground. Once this is dry I blow off the excess turf in a plastic bag and save it for later.
STEP 8
Finally, for the tuft-like lichen I mix PVA glue and water in 50/50 ratio and add to it a mixture of Green and Burnt grass fine turf. You want to get chunky consistency. Pick the small chunks with your brush tip and apply it to the tree trunk. When doing lichen and moss, always think about where would it be most likely for them to grow in real life.
STEP 9
Additionally, if you really want to spice up your trees, you can add some dead leaves to the bottom of the trunks and ivy climbing up on them. For vegetation, I like to use Ammo Mig products. If you are using Ammo Mig Ivy, I suggest that you paint it prior cutting it out of the sheet. It's much easier and safer.
And that is all for this tutorial. Hopefully you have taken something from it. :)
Till the next time, cheers! 🍻
Monday, August 17, 2020
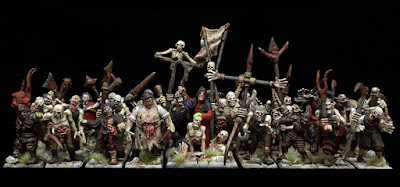
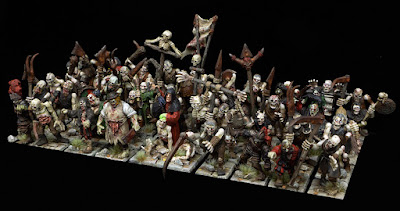
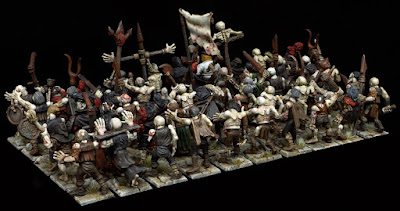
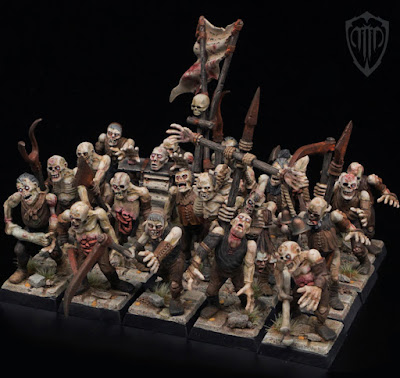
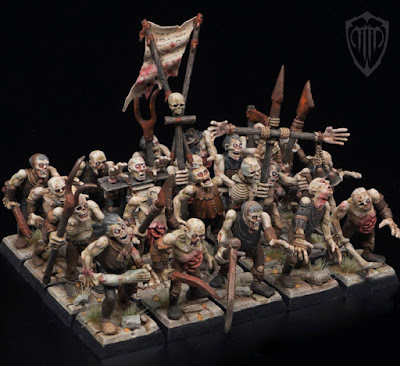
Todtstein Zombie Troops
"Just before sundown a great, terrible fog appeared, seemingly out of nowhere. From it, a huge dark shadow with burning red eyes emerged. That very moment, without any warning the whole village burst into flames, as if by some apocalyptic evil magic. There was no escape for the unfortunate and surprised villagers, young and old, as they started running down the streets, screaming their lungs out, while slowly being consumed by fire. Flesh falling apart with transforming, shifting colors. Bodies flailing and buildings collapsing through unnatural black burning. Those who fell continued twitching in agonizing torment as they slowly passed away. But they did not remain dead for long."
In days to come, no proof of black magic was found, but there was no other way to explain the obliterated village, burned to the ground, abandoned by the living and the dead. No bodies were found, neither those killed on that terrible day, nor those buried long time ago in the local graveyard. All of the graves were desecrated, every single one of them empty and gaping. Not a single plant, root, animal or any other lifeform was to sprout in the village of Brashovice ever again. The village remains a place of utter desolation.
This is how the first of many Todtstein legions came back to life, or more precisely, unlife.
For the first unit of zombies I decided to go with the Games Workshop Zombies from the Age Of Sigmar range. These models have been around for about twenty years, but I still like them very much! Partially because they remind me of the good old days when me and my friends played Warhammer Fantasy Battles. :) What I like about them the most is their expressive faces with the sunken and staring eyes, hanging tongues and grinding teeth! My main objection would be their oversized hands that are definitely out of scale. This by itself does not present a problem. It becomes a problem when you want to mix them with zombie models form other manufacturers to get some variety. Zombies from Fireforge Games or Mantic, for example, are about the same height as those of GW but their hands are way smaller, so it looks kind of silly. The other issue that I have with the GW zombies is the way that the shoulders look. When you assemble the models the shoulders look very exaggerated, with no transition from the shoulder to the torso. However, this can be fixed by adding some modelling putty. It does take additional effort, especially when you consider the numbers, but I think it is worth it.
To get some variety using only GW models, I did some minor conversions like ripping the jaw on one of the zombie heads and making his tongue hang out, or making the skull open exposing the brain inside, etc. My favorite conversion is the zombie staring at the sky with the slit throat. I always loved the severed head which can be found on the GW zombie sprue. Sadly, this had wasn't intended to be used as a zombie head. I always thought it had a perfect expression to be used as one, so I took the matter in my own hands and with a bit of Green Stuff created my favorite and unique zombie. I also used some parts from the OOP Empire Free Company Box and Empire Flagellants sprue to make the unit even more interesting. The unit is twenty zombies strong at the moment but I will be adding many more. The zombie legion will constantly grow! 🧟🧟🧟🧟🧟🧟🧟🧟🧟
Tuesday, August 11, 2020
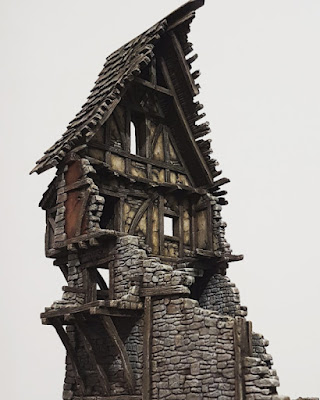
Ruined Townhouse
Since I started playing Warhammer Fantasy Battles, somewhere around 1998, I was always into tabletop scenery. When I came across the terrain section of the Empire Army Book (6th edition Warhammer), showing examples of the scratch built buildings, I was immediately inspired to make some terrain pieces for my own gaming table. My friends didn't care to much about terrain, they just wanted to play. I remember we even used books for the hills. :) I was on the other hand always drawn to the visual side. You could say they were purely gamers while I was more into painting and crafting side of the hobby. I find the game so much more immersive and appealing when you have decent scenery on your tabletop, be it natural features or buildings. I always found myself getting to the eye level of my miniatures and checking out surroundings, feeling like I'm there in the fantasy world or in the middle of the action. :)
Through my years in the hobby I have built plenty models from scratch and painted a lot of terrain pieces made by different companies. The beginnings were humble, I was making small structures like hobbit holes or trees made of bottle cleaners, but with time the projects became more challenging and complex. However, I newer tried building something out of the XPS foam. Having seen some inspiring videos on YouTube I felt there was a lot of potential in the material, so about a year ago I decided to give it a go.
For my first project made in XPS foam I decided to do a Ruined Townhouse which would fit nicely on my friend's Mordheim table. I did some basic sketches but the building was pretty straightforward and I didn't think too much about the design and made decisions and changes as I was crafting it. I did however think about gameplay, making sure that the floors are high enough to fit most of the miniatures and that there is enough openings for models to shoot and move through, as well as places to hide.
For cutting bigger pieces of foam I used Proxxon Thermocutter. I strongly
advise buying this piece of equipment if you are serious about making
terrain out of XPS foam. It allows you to make perfect and clean cuts. For gluing pieces together I started by using a glue gun but this showed to be pretty messy so I switched to PVA glue which turned out to be perfect for this kind of material. Before gluing different wall sections together I was considering how easy will it be to carve the surfaces after gluing. If I saw that some of the sections would be hard to reach, I would carve them first and then glue them in place.
I found the ball pen carving technique really intuitive and easy to master. The only thing I regret is using a blue ink pen. Later on this proved to be a mistake. Blue ink got mixed with grey acrylic paint making the greys bluish which was quite frustrating. If it was a black ink pen, it wouldn't matter.
Once the build was finished, my main concern was fragility of the XPS foam. Thin parts, like protruding beams, can easily snap if the players are not careful enough when moving their hands around the structure. In order to seal the foam and make it as hard as possible I used watered down PVA glue and gave the whole model a rich coat.
When this dried completely I started to paint the model. I immediately realized how nicely acrylic paint adheres to the foam.
Once the paintjob was finished I added some grass tufts, dead leaves and moss, to give it even more deteriorating and abandoned look. All in all, I am happy with the result, especially considering this was my first try in making terrain out of XPS foam.
In the near future I plan to make an in-depth tutorial showing the techniques I used to make this Ruined Townhouse.
Cheers guys! 🍻


