Far back, since I was drawn to painting miniatures, I was always interested in scale modeling as well. I was amazed by incredible dioramas people make. However painting miniatures for my Warhammer armies was priority and I newer found the time to try myself in that field. All that changed about three years ago when I finally decided to pick one of the kits and just do it! Since I was always into WWII armored fighting vehicles, I decided to make a tank. So for my first kit I was thinking about German Panzer IV or Russian T34. In the end I decided to go with Panzer IV. Regarding the brand of the kit, I had to do a little research on the internet. Dragon kits seemed like a top tier and a good choice.
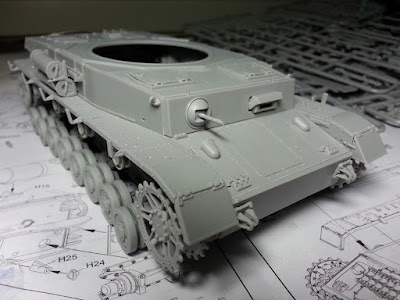
Once I got the kit it was time for assembly. I was surprised how many parts were in the kit. The parts fitted together perfectly and the instructions were very clear so I didn't encounter any problems. However, it took me awhile to complete the build because the kit is really detailed.
I wanted my Panzer to look a bit battered, as though he has seen some battle so I bent the plastic and did scratches on some parts (like on these fenders). Also this was the first time I was working with photo etched parts. These are really fine and thin parts that make your model look very realistic once it is painted.
During the building process I lost two handles that go on the turret. I couldn't find them anywhere, so in the end I had to make my own using two pieces of wire. They turned out pretty good I think.
I decided not to use plastic tracks that come with the kit and bought the metal ones from Friul Models for maximum realism. These are very expensive and the process of putting the tracks together is tedious but really worth the effort! These tracks when assembled act like real ones and sag naturally between the wheels.
Since the tracks are made of metal, instead of painting them, I decided to try the burnishing liquid method to naturally weather them. I dipped the tracks in the liquid for a few minutes and the metal began to appear dark and rusty. The process is easy and effortless and the result is perfect. To finish them off I used the sanding paper to rub off some of the rust and reveal the metal on external surface.
To make the Panzer really alive I wanted to add some crew members. I bought the SS Panzer comander from Alpine Models. Really nice model, very crisp and detailed.
Once I acquired all the products I needed and the model was assembled It was time to start painting. Since I didn't have a clue about AFV painting techniques, I searched the net for tutorials. I came across Scale Model Guide website and the guy there made I complete tutorial, covering all techniques using non other then the same Panzer IV I was going to paint! This made me pay for the tutorial. :) I can honestly say that the step by step video was worth every penny. I recommend it to anyone who is new to the hobby and is into AFV. It is really straightforward and easy to follow.
I was really pleased with the final result, especially since this was my first scale model and most of the techniques were new to me. So with no further ado here are the final photos: