Showing posts with label XPS foam. Show all posts

Sunday, December 13, 2020

Roadside Shrine

For my second project in XPS foam I wanted to do something smaller and packed with details. Roadside shrine came to mind! I thought it would make a perfect addition to my Mordheim gaming table. And it did! :) In the area were I live there are lots of small roadside shrines so I didn't lack the inspiration. I took from each one what I liked the most and combined it in my own design. The idea was to create a small structure with barred windows on the sides and iron bar gate in the front. The shrine would hold an icon, some parchments with sacred text and two torches.

For the window bars I used a cheap plastic garden fence that I bought in the local hardware store. Gate and spikes are from an old Tabletop World Graveyard kit. Icon is from old Empire Steam Tank (I think), torches are from Vampire Counts Black Coach and parchments are from Warhammer 40k Fyodor Karamazov.

After I have finished the build I sealed everything with watered down PVA glue. Once this was dry I hit everything with black basecoat color. For me, basecaoting scratch built terrain in uniform color is perhaps the most satisfying moment in the hobby. :)

Now it was time to bring the piece to life with some colors. I'm happy with the way it turned out, especially the choice of colors. I also added a rat to the base to make it look more grim. The only thing I dislike is the climbing ivy. This was the first time I was using it. I should have washed it with some brown color and bend some of the leaves to make it look more natural. All in all I'm really pleased with the final result.

mordheim terrain
mordheim terrain
mordheim terrain
mordheim terrain
mordheim terrain
mordheim terrain
mordheim terrain
mordheim terrain

Sunday, December 6, 2020

Flagstone Bases

In this tutorial I am going to show you how I make the flagstone bases for my miniatures, easy and cheap. All you need is your bases, thin sheet of XPS foam, PVA glue, ball pen and an old brush. In this example I am going to do the 25mm square bases but I use the same method for bases of all sizes and shapes.

BUILDING THE BASES

First thing you need to do is clean all of the bases from the excess flesh formed in the casting process. Since you are going to use bases as rulers for cutting the foam, you don't want to bump into unwanted lumps of plastic.

Turn you base upside down on the thin sheet of XPS foam, press it gently and run your scalpel along the edges of the base. Make sure that you have your blade approximately at the same angle as your base profile. Be careful not to damage the base by cutting into the plastic. Face the blade slightly outwards while you cut.
Once you cut out the foam, it is a good idea to check if it fits nicely with the base. Place it on the base and trim if necessary because you don't want the foam sticking out of the base. I like to do the bases in bulk, most often 20 pieces at a time.
Next step, etch the stone designs into the foam. I use the regular black ball pen for etching. There is a small chance that the ink mixes with paint so you don't want it to be blue or red.
After you are done with etching, it is time to glue the foam pieces onto the bases. Apply the PVA glue onto the base (make sure that you apply it all the way to the edges) and gently press the foam onto it. Use your finger to wipe of the excess glue from the sides of the base. In this step it is good idea to do one by one, because the glue will start to dry if you first apply it to all of the bases and then start attaching the foam. Before moving to the next step leave the bases to dry at least for an hour!
Next, we want to seal the foam an make it plasticky. Apply watered down PVA glue (about 60% glue, 40% water) on the foam part (both the top and the sides). Again use your finger to wipe of any excess glue from the sides of the bases.
Leave the bases over night for the glue to settle and dry and your flagstone bases are ready for painting! :) Note that it is really important to seal the foam prior gluing anything to your bases using superglue because otherwise the glue will eat through it.
Here are some examples of the miniatures based using this technique:
mordheim
mordheim
mordheim
mordheim
mordheim

Tuesday, August 11, 2020

Ruined Townhouse

Since I started playing Warhammer Fantasy Battles, somewhere around 1998, I was always into tabletop scenery. When I came across the terrain section of the Empire Army Book (6th edition Warhammer), showing examples of the scratch built buildings, I was immediately inspired to make some terrain pieces for my own gaming table. My friends didn't care to much about terrain, they just wanted to play. I remember we even used books for the hills. :) I was on the other hand always drawn to the visual side. You could say they were purely gamers while I was more into painting and crafting side of the hobby. I find the game so much more immersive and appealing when you have decent scenery on your tabletop, be it natural features or buildings. I always found myself getting to the eye level of my miniatures and checking out surroundings, feeling like I'm there in the fantasy world or in the middle of the action. :)


Through my years in the hobby I have built plenty models from scratch and painted a lot of terrain pieces made by different companies. The beginnings were humble, I was making small structures like hobbit holes or trees made of bottle cleaners, but with time the projects became more challenging and complex. However, I newer tried building something out of the XPS foam. Having seen some inspiring videos on YouTube I felt there was a lot of potential in the material, so about a year ago I decided to give it a go.

For my first project made in XPS foam I decided to do a Ruined Townhouse which would fit nicely on my friend's Mordheim table. I did some basic sketches but the building was pretty straightforward and I didn't think too much about the design and made decisions and changes as I was crafting it. I did however think about gameplay, making sure that the floors are high enough to fit most of the miniatures and that there is enough openings for models to shoot and move through, as well as places to hide.

For cutting bigger pieces of foam I used Proxxon Thermocutter. I strongly advise buying this piece of equipment if you are serious about making terrain out of XPS foam. It allows you to make perfect and clean cuts. For gluing pieces together I started by using a glue gun but this showed to be pretty messy so I switched to PVA glue which turned out to be perfect for this kind of material. Before gluing different wall sections together I was considering how easy will it be to carve the surfaces after gluing. If I saw that some of the sections would be hard to reach, I would carve them first and then glue them in place.

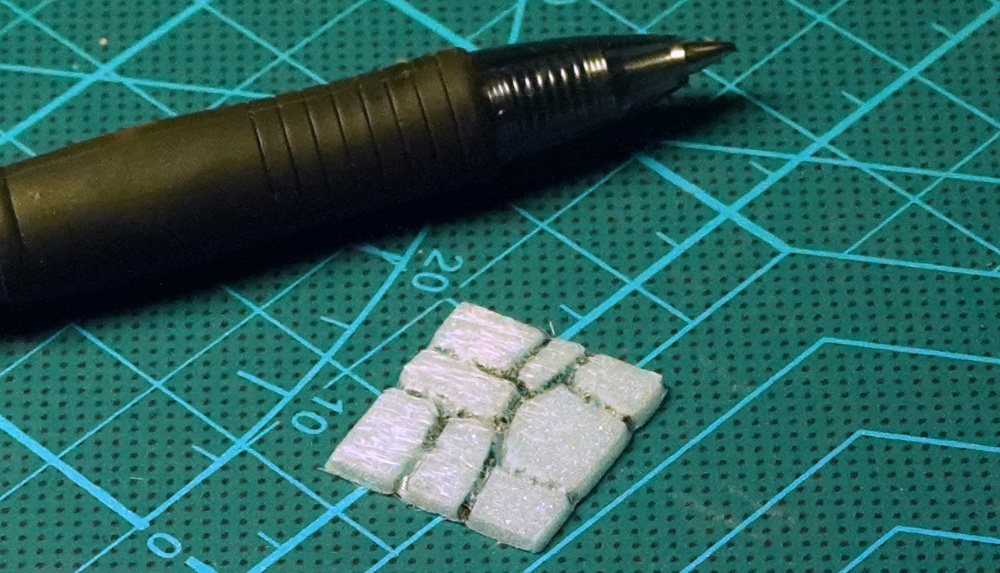
I found the ball pen carving technique really intuitive and easy to master. The only thing I regret is using a blue ink pen. Later on this proved to be a mistake. Blue ink got mixed with grey acrylic paint making the greys bluish which was quite frustrating. If it was a black ink pen, it wouldn't matter.

Once the build was finished, my main concern was fragility of the XPS foam. Thin parts, like protruding beams, can easily snap if the players are not careful enough when moving their hands around the structure. In order to seal the foam and make it as hard as possible I used watered down PVA glue and gave the whole model a rich coat.

When this dried completely I started to paint the model. I immediately realized how nicely acrylic paint adheres to the foam.

mordheim terrain

Once the paintjob was finished I added some grass tufts, dead leaves and moss, to give it even more deteriorating and abandoned look. All in all, I am happy with the result, especially considering this was my first try in making terrain out of XPS foam.

mordheim terrain
mordheim terrain
mordheim terrain
mordheim terrain
mordheim terrain
mordheim terrain
mordheim terrain
mordheim terrain
mordheim terrain
 

In the near future I plan to make an in-depth tutorial showing the techniques I used to make this Ruined Townhouse.

Cheers guys! 🍻