Showing posts with label tutorial. Show all posts

Thursday, May 6, 2021

My Recipe For Painting Stone

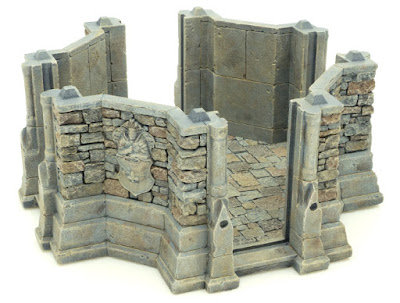
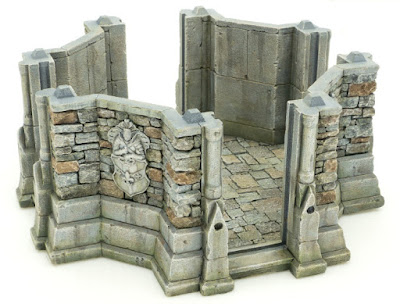
In this tutorial I will give you my recipe for painting stone. I will cover all the steps that I use to achieve the natural look of a stone wall. I will be doing an example of a wall with pronounced color differences between separate stones to make it more visible what I am doing in each step. The result will be a wall like this:
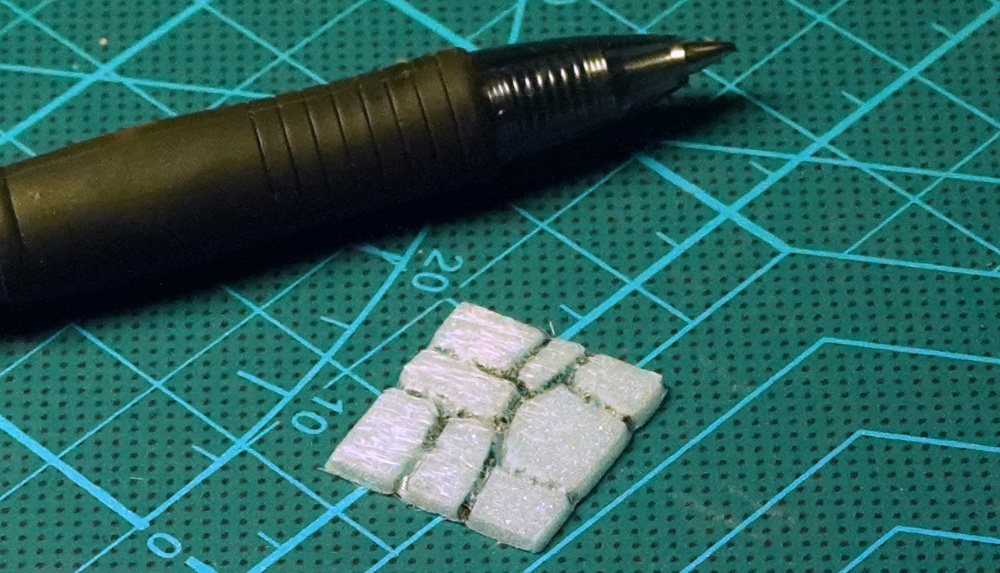
 If you want your wall to have more subtle differences between the separate stones, simply tone down colors (add even more water to the paint) in steps 2, 3 and 4, and skip step 13. Also if you want your wall to be more greyish, skip the step 8. The result will be a wall like this:


 STEP 1

Basecoat the model in dark grey color. I am using Vallejo Game Air – Blue Grey. Then Highlight the model with a light grey color. I am using Vallejo Game Air - Cold Grey. The easiest way to do this is by using an airbrush or spray cans. However you can use a regular brush as well. In that case use drybrush technique to apply lighter grey over the dark grey.

STEP 2 

To get some variety in stone tones and make it look more realistic, you will be adding different brown colors to individual stones. Pick some of the stones with watered down Citadel – Mournfang Brown. Dilute the paint significantly, you want a watercolor consistency. You can also vary in intensity of the color on different stones. More variety - the better. On the large flat surfaces make random splotches with the same color.

STEP 3

Repeat the process from step 2 but using Citadel – XV-88. This time pick different stones.

STEP 4

Repeat the process from two previous steps, this time using Citadel - Agrax Eartshade. Also, leave some of the stones grey, don’t paint them all in brown colors.

STEP 5

Drybrush the whole model with Citadel – Karak Stone.

STEP 6

Drybrush the model with Citadel - Pallid Wych Flesh. Don't overdo it.

STEP 7

Wash the whole model with watered down sand color. I am using Vallejo Game Air – Sand. Dilute your paint significantly. After applying the wash make sure to collect the excess paint from the recesses using a dry brush, you don't want the bright color to accumulate in the recesses. This wash is serving as a filter necessary for further steps.

STEP 8

Repeat the same process as in step 7 but this time using Vallejo Game Air - Earth color and apply it sporadically, not over the whole model.

STEP 9 

Again drybrush the model lightly with Citadel - Pallid Wych Flesh. Concentrate on the edges. It is a good idea to apply more of this color on the coat of arms relief to make it stand out more.

STEP 10

Now it’s time to add some contrast between different sections of the building and make it more visually appealing. Use Citadel – Nuln Oil and apply it along the edges where different planes of the building meet. Also, use the black wash to emphasize the parts you want, like the coat of arms relief for instance. Black wash was added all around the relief to make it really pop. On the flat areas, do some streaking effects to break monotony. Use a detailed brush to create some streaking effects on the relief. Whenever you apply the wash, blend it with stone using water. Also, a good general rule is to add more of the dark wash to the lower parts of the structure, where damp is more likely to collect.

STEP 11

Add some green tint to different areas of the model. Citadel – Athonian Camoshade is perfect for this. Concentrate most on the parts where you already applied the black wash. This will give it a nice mossy effect and make your walls look as though they ‘we been affected by moisture.

STEP 12

To add some richness to the green tones drybrush very lightly some of the areas (where you applied green wash) with Citadel - Deathworld Forest or any other green you like. Make it really subtle.

STEP 13

To reintroduce the contrast between some of the stones you will again pick individual stones with watered down Citadel – Mournfang Brown. Note that it is best to pick those stones that you already painted in this color in step 2. Pick only some of them, don’t overdo it.

STEP 14

Finally to make your walls really crisp, you will highlight some of the edges. Using detail brush run along the edges of some of the stones with Citadel – Pallid Wych Flesh. Do this on all of the stones you have painted in Mournfang Brown in the previous step and then some of the other stones.

And there you have it guys! Realistic looking, and weathered stone structure. Hope you find this tutorial useful. :) Cheers! 🍻

Saturday, December 12, 2020

Converting Kite Shields

armored skeletons
For my OOP Armored Skeletons I wanted to create special shields and make the unit really stand out. The original ones are small rounded shields with decorations that look a bit childish to me, although, I must admit, totally in the spirit of the 90s Warhammer Fantasy Battles. :)
Looking at the miniatures I thought that the kite shields would fit them perfectly and make them look striking. It then came to me that the Tomb Kings tower shields that I have laying around could be converted into cool looking kite(ish) shields.
Since I don't have the plastic ones, but only metal, I decided to make molds in silicone rubber and cast the shields in resin. This way I will save the original shields and make the converting process easier. You can use plastic ones if you have them. I decided to use three different designs.
After I made my recasts in resin it was time to start cutting and shaving unwanted parts of the original design. Parts that I cut off are marked with red color, and those that I shaved off are marked in green. To get that V shape I simply cut off the lower parts of the shield. I removed those hanging parchments on the front side of the shields. On the back I removed the handles and over-leaping canvas.
Next, it was time to carve in the wood-grain in the parts that got flat after shaving. For this I used a sharp scalpel blade.
Now the shields were ready for some modeling putty. I used Green Stuff to model the metal rim on the edges of the shields and the circle (gluing area) on the back side.
Finally, after the Green Stuff has hardened completely, I added rivets to the rims on both sides.
To save some time, I again made the mold for the converted shields and multiplied them. :)
And here you can see the shields in action:
armored skeletons
armored skeletons
armored skeletons
armored skeletons

Sunday, December 6, 2020

Flagstone Bases

In this tutorial I am going to show you how I make the flagstone bases for my miniatures, easy and cheap. All you need is your bases, thin sheet of XPS foam, PVA glue, ball pen and an old brush. In this example I am going to do the 25mm square bases but I use the same method for bases of all sizes and shapes.

BUILDING THE BASES

First thing you need to do is clean all of the bases from the excess flesh formed in the casting process. Since you are going to use bases as rulers for cutting the foam, you don't want to bump into unwanted lumps of plastic.

Turn you base upside down on the thin sheet of XPS foam, press it gently and run your scalpel along the edges of the base. Make sure that you have your blade approximately at the same angle as your base profile. Be careful not to damage the base by cutting into the plastic. Face the blade slightly outwards while you cut.
Once you cut out the foam, it is a good idea to check if it fits nicely with the base. Place it on the base and trim if necessary because you don't want the foam sticking out of the base. I like to do the bases in bulk, most often 20 pieces at a time.
Next step, etch the stone designs into the foam. I use the regular black ball pen for etching. There is a small chance that the ink mixes with paint so you don't want it to be blue or red.
After you are done with etching, it is time to glue the foam pieces onto the bases. Apply the PVA glue onto the base (make sure that you apply it all the way to the edges) and gently press the foam onto it. Use your finger to wipe of the excess glue from the sides of the base. In this step it is good idea to do one by one, because the glue will start to dry if you first apply it to all of the bases and then start attaching the foam. Before moving to the next step leave the bases to dry at least for an hour!
Next, we want to seal the foam an make it plasticky. Apply watered down PVA glue (about 60% glue, 40% water) on the foam part (both the top and the sides). Again use your finger to wipe of any excess glue from the sides of the bases.
Leave the bases over night for the glue to settle and dry and your flagstone bases are ready for painting! :) Note that it is really important to seal the foam prior gluing anything to your bases using superglue because otherwise the glue will eat through it.
Here are some examples of the miniatures based using this technique:
mordheim
mordheim
mordheim
mordheim
mordheim

Saturday, August 22, 2020

My Recipe For Painting Tree Trunks

Here I will show you the process I use to paint trees covered in different types of lichen which is most often found on dead or dying trees. For this tutorial I will be using newly designed Dead Trees from Tabletop World which will be released pretty soon.

Dead Tree
STEP 1
First tings first. We need to prepare the model for painting. Tabletop World models come precleaned and are ready to paint out of the box. However, these Dead Trees come in several pieces and need to be assembled. Once you assemble your tree, use modelling putty to fill the gaps at the joints.

Dead Tree

STEP 2
Basecoat the model and make a zenithal highlight. You can apply zenithal highlights with an airbrush or spray cans. The idea is to spray the brighter colors directly from above a dark painted model. This way yo will add contrast to a model and reveal details fast and easy.


  • First, basecoat the model in black color. I like to use Vallejo Nato Black
  • Next, I use 50/50 mix of Vallejo Nato Black and Cold Grey and spray it downwards in a wider angle. 
  • Finally I like to use pure Vallejo Cold Grey and spray it directly from the top in about 45% degree angle.

Dead Tree

STEP 3
Give the whole model a layer of watered down brown color (I like to use Vallejo Dark Fleshtone mixed with Nato Black). You want your paint to be really thinned down and transparent so that you don't loose shades and highlights achieved in the previous step. This layer is more like a filter, giving your grays a brownish tint without loosing contrast.


Dead Tree
STEP 4
To emphasize the bark texture even more I do a light drybrush technique with Citadel Karak Stone color. After this, I like to randomly apply watered down Citadel Agrax Earthshade to give some richness and variety to the colors, especially to the parts where I feel I overdid the drybrush technique, to tone it down.

Dead Tree

STEP 5
To paint the exposed sapwood where the bark fell off I paint the areas in Citadel Karak Stone. Using the drybrush technique I highlight these areas in the middle with Citadel Ushabti Bone color. Finally I apply Agrax Earthshade to the edges, where sapwood and bark meet. Using a clean, wet brush I make a transition towards the middle over the colors underneath.


Dead Tree

STEP 6
Time to add some lichen. In this step I use five colors. You can get away with using less, but to achieve really nice realistic effect and variety in colors, I advise you to use at least three. The colors of lichen my vary from green, blue and grey to yellow and brown. Also, lichens grow in a wide range of shapes and forms. Some are growing like tufts, some are two-dimensional leaf-like lobes, some are crust-like, some powdery etc. To represent different forms of lichen I will be using both paint (two-dimensional lichen) and different types of fine turf (three-dimensional lichen).


In this step I will be doing two-dimensional lichen. I start off by applying Citadel Waaagh Flesh with stippling technique. It is important that you use an old and distressed brush in this process. I dab off most of the paint on the paper towel and start applying the paint with dabbing motion. I repeated this process with the rest of my colors going from darker to lighter (Vallejo Foul Green, Citadel Nurgling Green, Citadel Nihilakh Oxide and Citadel Ceramite White). I tend to stipple these colors in condensed areas, next to each other to achieve variety in tones. Also, I do more lichen at the bottom of the tree and less going upwards.


 Dead Tree
STEP 7
For more three-dimensional lichen and moss I use two types of fine turf from Woodland Scenics: Green Grass and Burnt Grass. I use predominantly Burnt Grass, which is more yellowish, for lichen, and Green Grass for moss. However, I do like to combine the two in some areas. For lichen, I dab watered down PVA glue in small areas, preferably next to the already painted lichen, and than simply sprinkle the Burnt Grass over it. For moss I apply PVA glue in larger areas and proceed with the same process using Green Grass. I tend to do more moss towards the ground. Once this is dry I blow off the excess turf in a plastic bag and save it for later.

Dead Tree

STEP 8
Finally, for the tuft-like lichen I mix PVA glue and water in 50/50 ratio and add to it a mixture of Green and Burnt grass fine turf. You want to get chunky consistency. Pick the small chunks with your brush tip and apply it to the tree trunk. When doing lichen and moss, always think about where would it be most likely for them to grow in real life.


Dead Tree
STEP 9
Additionally, if you really want to spice up your trees, you can add some dead leaves to the bottom of the trunks and ivy climbing up on them. For vegetation, I like to use Ammo Mig products. If you are using Ammo Mig Ivy, I suggest that you paint it prior cutting it out of the sheet. It's much easier and safer. 


Dead Tree

And that is all for this tutorial. Hopefully you have taken something from it. :)
Till the next time, cheers! 🍻