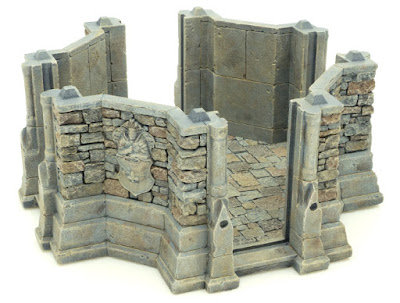
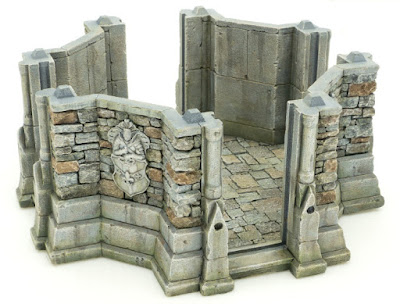
In this tutorial I will give you my recipe for painting stone. I will cover all the steps that I use to achieve the natural look of a stone wall. I will be doing an example of a wall with pronounced color differences between separate stones to make it more visible what I am doing in each step. The result will be a wall like this:

STEP 1
Basecoat the model in dark grey color. I am using Vallejo Game Air – Blue Grey. Then Highlight the model with a light grey color. I am using Vallejo Game Air - Cold Grey. The easiest way to do this is by using an airbrush or spray cans. However you can use a regular brush as well. In that case use drybrush technique to apply lighter grey over the dark grey.
STEP 2To get some variety in stone tones and make it look more realistic, you will be adding different brown colors to individual stones. Pick some of the stones with watered down Citadel – Mournfang Brown. Dilute the paint significantly, you want a watercolor consistency. You can also vary in intensity of the color on different stones. More variety - the better. On the large flat surfaces make random splotches with the same color.
STEP 3Repeat the process from step 2 but using Citadel – XV-88. This time pick different stones.
STEP 4Repeat the process from two previous steps, this time using Citadel - Agrax Eartshade. Also, leave some of the stones grey, don’t paint them all in brown colors.
STEP 5Drybrush the whole model with Citadel – Karak Stone.
STEP 6Drybrush the model with Citadel - Pallid Wych Flesh. Don't overdo it.
STEP 7Wash the whole model with watered down sand color. I am using Vallejo Game Air – Sand. Dilute your paint significantly. After applying the wash make sure to collect the excess paint from the recesses using a dry brush, you don't want the bright color to accumulate in the recesses. This wash is serving as a filter necessary for further steps.
STEP 8Repeat the same process as in step 7 but this time using Vallejo Game Air - Earth color and apply it sporadically, not over the whole model.
STEP 9Again drybrush the model lightly with Citadel - Pallid Wych Flesh. Concentrate on the edges. It is a good idea to apply more of this color on the coat of arms relief to make it stand out more.
STEP 10Now it’s time to add some contrast between different sections of the building and make it more visually appealing. Use Citadel – Nuln Oil and apply it along the edges where different planes of the building meet. Also, use the black wash to emphasize the parts you want, like the coat of arms relief for instance. Black wash was added all around the relief to make it really pop. On the flat areas, do some streaking effects to break monotony. Use a detailed brush to create some streaking effects on the relief. Whenever you apply the wash, blend it with stone using water. Also, a good general rule is to add more of the dark wash to the lower parts of the structure, where damp is more likely to collect.
STEP 11Add some green tint to different areas of the model. Citadel – Athonian Camoshade is perfect for this. Concentrate most on the parts where you already applied the black wash. This will give it a nice mossy effect and make your walls look as though they ‘we been affected by moisture.
STEP 12To add some richness to the green tones drybrush very lightly some of the areas (where you applied green wash) with Citadel - Deathworld Forest or any other green you like. Make it really subtle.
STEP 13To reintroduce the contrast between some of the stones you will again pick individual stones with watered down Citadel – Mournfang Brown. Note that it is best to pick those stones that you already painted in this color in step 2. Pick only some of them, don’t overdo it.
STEP 14Finally to make your walls really crisp, you will highlight some of the edges. Using detail brush run along the edges of some of the stones with Citadel – Pallid Wych Flesh. Do this on all of the stones you have painted in Mournfang Brown in the previous step and then some of the other stones.
And there you have it guys! Realistic looking, and weathered stone structure. Hope you find this tutorial useful. :) Cheers! 🍻


Fukking awesome master!
ReplyDeleteGreat tutorial! Another great terrain ;)
ReplyDeleteThanks Michal! :)
ReplyDeleteThank you Seba! :)
ReplyDeleteA great use of Nuln Oil for streaking stuff on flat surfaces. I like how diversified stones are as well. Thanks for a great tutorial!
ReplyDeleteThank you! I am glad you find it useful. :)
ReplyDeleteThanks for sharing this article. Nice and informative post. Rebecca Tolk
ReplyDeleteThank you Rebecca! :)
ReplyDeleteFollowing along an it is looking great so far! For the Vallejo sand color, I want to make sure I grab the right one. Is it 71.075? 71.138?
ReplyDeleteGlad you are seeing results! :)
ReplyDelete71.075 is the one. ;)
Fantastic tutorial! Vallejo got two blue grey, is it 71115 or 71304 ?
ReplyDeleteThank you! Glad it helps. :) It's 71304.
DeleteThis was really helpful. I would like to see your turorials on making terrain
ReplyDelete