

First tings first. We need to prepare the model for painting. Tabletop World models come precleaned and are ready to paint out of the box. However, these Dead Trees come in several pieces and need to be assembled. Once you assemble your tree, use modelling putty to fill the gaps at the joints.

STEP 2
Basecoat the model and make a zenithal highlight. You can apply zenithal highlights with an airbrush or spray cans. The idea is to spray the brighter colors directly from above a dark painted model. This way yo will add contrast to a model and reveal details fast and easy.

- First, basecoat the model in black color. I like to use Vallejo Nato Black.
- Next, I use 50/50 mix of Vallejo Nato Black and Cold Grey and spray it downwards in a wider angle.
- Finally I like to use pure Vallejo Cold Grey and spray it directly from the top in about 45% degree angle.


To emphasize the bark texture even more I do a light drybrush technique with Citadel Karak Stone color. After this, I like to randomly apply watered down Citadel Agrax Earthshade to give some richness and variety to the colors, especially to the parts where I feel I overdid the drybrush technique, to tone it down.

STEP 5
To paint the exposed sapwood where the bark fell off I paint the areas in Citadel Karak Stone. Using the drybrush technique I highlight these areas in the middle with Citadel Ushabti Bone color. Finally I apply Agrax Earthshade to the edges, where sapwood and bark meet. Using a clean, wet brush I make a transition towards the middle over the colors underneath.


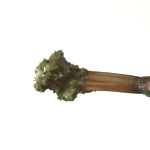
STEP 6
Time to add some lichen. In this step I use five colors. You can get away with using less, but to achieve really nice realistic effect and variety in colors, I advise you to use at least three. The colors of lichen my vary from green, blue and grey to yellow and brown. Also, lichens grow in a wide range of shapes and forms. Some are growing like tufts, some are two-dimensional leaf-like lobes, some are crust-like, some powdery etc. To represent different forms of lichen I will be using both paint (two-dimensional lichen) and different types of fine turf (three-dimensional lichen).

In this step I will be doing two-dimensional lichen. I start off by applying Citadel Waaagh Flesh with stippling technique. It is important that you use an old and distressed brush in this process. I dab off most of the paint on the paper towel and start applying the paint with dabbing motion. I repeated this process with the rest of my colors going from darker to lighter (Vallejo Foul Green, Citadel Nurgling Green, Citadel Nihilakh Oxide and Citadel Ceramite White). I tend to stipple these colors in condensed areas, next to each other to achieve variety in tones. Also, I do more lichen at the bottom of the tree and less going upwards.


For more three-dimensional lichen and moss I use two types of fine turf from Woodland Scenics: Green Grass and Burnt Grass. I use predominantly Burnt Grass, which is more yellowish, for lichen, and Green Grass for moss. However, I do like to combine the two in some areas. For lichen, I dab watered down PVA glue in small areas, preferably next to the already painted lichen, and than simply sprinkle the Burnt Grass over it. For moss I apply PVA glue in larger areas and proceed with the same process using Green Grass. I tend to do more moss towards the ground. Once this is dry I blow off the excess turf in a plastic bag and save it for later.

STEP 8
Finally, for the tuft-like lichen I mix PVA glue and water in 50/50 ratio and add to it a mixture of Green and Burnt grass fine turf. You want to get chunky consistency. Pick the small chunks with your brush tip and apply it to the tree trunk. When doing lichen and moss, always think about where would it be most likely for them to grow in real life.

Additionally, if you really want to spice up your trees, you can add some dead leaves to the bottom of the trunks and ivy climbing up on them. For vegetation, I like to use Ammo Mig products. If you are using Ammo Mig Ivy, I suggest that you paint it prior cutting it out of the sheet. It's much easier and safer.


And that is all for this tutorial. Hopefully you have taken something from it. :)
Till the next time, cheers! 🍻
wonderful tutorial and great timing too as i plan a little wood , will certainly be using some of these techniques thanks for sharing!
ReplyDeleteThanks man! Looking forward to seeing your wood grow! :)
Delete