After finishing the plaster on all of the walls, which took my a while, I am now doing final tedious work...putting the shingles on the roof and filling gaps with green stuff. After that I have a couple of hundred rivets to do. 😅


After finishing the plaster on all of the walls, which took my a while, I am now doing final tedious work...putting the shingles on the roof and filling gaps with green stuff. After that I have a couple of hundred rivets to do. 😅
This goodhearted monk is an Altburg graveyard church resident. One can imagine him slicing his matured Cheddar complimented with a nice cup of wine. :) The mini is totally different from the dark characters I'm used to paint and it was lot of fun. :D Townsfolk run to this little guy to seek refuge when Vampire Counts are approaching. 🧛
The miniature as well as the scenery is from Tabletop World.


With the work I have done on the roof the house is starting to get the final shape. I also started to build a stone chimney and added details to the left side of the house. Soon I will be adding plaster to the walls, rivets to the beams and planks, and shingles to the roof. I also plan to add some windows to the roof but I didn't came up with satisfying design yet.


Continuing the work on the house. I moved to the upper floor now. Apart form the basic construction, I'm doing mainly timber at the moment. Afterwards I will be adding stone and plaster to the walls. Everything is going as planed so far.
First I constructed the wooden floor which is supported by the beams bellow. Then I added additional wooden beams to support the floor, especially the balcony.
 Then I started to raise walls and work on the balcony. I deconstructed the balcony of the Tabletop World Townhouse II model and with a bit of reconstruction and tweaking I made a new, smaller one which fits perfectly with the new house.
 Then I moved on with construction and started to add some details, mostly timber.
 And this is where I'm currently at. I did a second entrance in the back of the house which will also have a crane and serve as a little storage room.
More work has been done on the house! First I finished the stone work on the other side of the house, apart from the section bellow the stairs which needed to be completely remodeled.


I finally found some time to continue work on my Townhouse. I did some stonework and added wooden beams to the walls. I also added two windows. When deciding were to put windows and other openings I always take in consideration both the esthetics and the gameplay.
I really like how this project is developing.


Back to my Altburg Townhouse project! I decided to completely change the design of the original Merchant House model. I have lowered the floor so that the interior is a bit higher and can fit the minis more easily. I also replaced original wood planks with flagstone. I removed the front wall and extended the whole floor for about 2cm, again to have more space inside. The original doors were fixed, so I decided to replace them with the hinged version. Now the doors are fully functional. I removed all the textures and details in interior as well as on the exterior because I plan to completely redesign them.


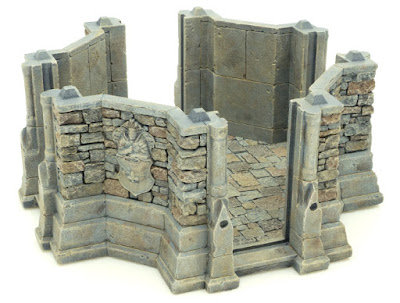
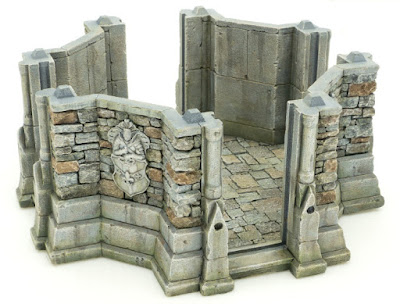
In this tutorial I will give you my recipe for painting stone. I will cover all the steps that I use to achieve the natural look of a stone wall. I will be doing an example of a wall with pronounced color differences between separate stones to make it more visible what I am doing in each step. The result will be a wall like this:


Basecoat the model in dark grey color. I am using Vallejo Game Air – Blue Grey. Then Highlight the model with a light grey color. I am using Vallejo Game Air - Cold Grey. The easiest way to do this is by using an airbrush or spray cans. However you can use a regular brush as well. In that case use drybrush technique to apply lighter grey over the dark grey.

To get some variety in stone tones and make it look more realistic, you will be adding different brown colors to individual stones. Pick some of the stones with watered down Citadel – Mournfang Brown. Dilute the paint significantly, you want a watercolor consistency. You can also vary in intensity of the color on different stones. More variety - the better. On the large flat surfaces make random splotches with the same color.

Repeat the process from step 2 but using Citadel – XV-88. This time pick different stones.

Repeat the process from two previous steps, this time using Citadel - Agrax Eartshade. Also, leave some of the stones grey, don’t paint them all in brown colors.

Drybrush the whole model with Citadel – Karak Stone.

Drybrush the model with Citadel - Pallid Wych Flesh. Don't overdo it.

Wash the whole model with watered down sand color. I am using Vallejo Game Air – Sand. Dilute your paint significantly. After applying the wash make sure to collect the excess paint from the recesses using a dry brush, you don't want the bright color to accumulate in the recesses. This wash is serving as a filter necessary for further steps.

Repeat the same process as in step 7 but this time using Vallejo Game Air - Earth color and apply it sporadically, not over the whole model.
Again drybrush the model lightly with Citadel - Pallid Wych Flesh. Concentrate on the edges. It is a good idea to apply more of this color on the coat of arms relief to make it stand out more.

Now it’s time to add some contrast between different sections of the building and make it more visually appealing. Use Citadel – Nuln Oil and apply it along the edges where different planes of the building meet. Also, use the black wash to emphasize the parts you want, like the coat of arms relief for instance. Black wash was added all around the relief to make it really pop. On the flat areas, do some streaking effects to break monotony. Use a detailed brush to create some streaking effects on the relief. Whenever you apply the wash, blend it with stone using water. Also, a good general rule is to add more of the dark wash to the lower parts of the structure, where damp is more likely to collect.

Add some green tint to different areas of the model. Citadel – Athonian Camoshade is perfect for this. Concentrate most on the parts where you already applied the black wash. This will give it a nice mossy effect and make your walls look as though they ‘we been affected by moisture.

To add some richness to the green tones drybrush very lightly some of the areas (where you applied green wash) with Citadel - Deathworld Forest or any other green you like. Make it really subtle.

To reintroduce the contrast between some of the stones you will again pick individual stones with watered down Citadel – Mournfang Brown. Note that it is best to pick those stones that you already painted in this color in step 2. Pick only some of them, don’t overdo it.
Finally to make your walls really crisp, you will highlight some of the edges. Using detail brush run along the edges of some of the stones with Citadel – Pallid Wych Flesh. Do this on all of the stones you have painted in Mournfang Brown in the previous step and then some of the other stones.


It's time to share with you the project that took most of my time for several months and kept me away from my Vampire Counts - the grand Tabletop World Graveyard! It was a crazy ride and I really enjoyed the whole process. After planning out the display board, I started by painting individual graveyard structures like the chapel, mausoleum, tomb, etc. Then I did all the smaller features: tombstones, vases, crows,... Finally, I painted all of the walls and fences and dead trees.
To create the flagstone walkways I used segments of Tabletop World Town Square.
I wanted the Graveyard to look pretty weathered, with lots of rusty elements and parts overgrown with grass, moss and lichen. I also wanted a lot of crows resting on the trees, tombstones and other graveyard features to give it that creepy feel.
Without further ado, I present to you the finished Graveyard:


As much as I enjoyed working on this big project, at the same time I was frustrated that my Undead are not progressing. However, now I have great scenic piece to use for taking photos of my future Vampire Counts characters and units! 🧛
Very soon I will be posting painting tutorials on how I painted the stone, wood, rust and oxidized copper on this Graveyard! So keep an eye for it. ;)
Now back to my beloved Undead! 💀
Cheers guys! 🍻